GRE Session
In GRE mode, a Watcher forms a real OSPF/IS-IS adjacency with one of your routers over a GRE tunnel, then passively forwards every link-state change into Topolograph. Unlike a text file, this is a live feed — the graph and the event timeline update as the network changes.
GRE mode works with essentially any router that can build a GRE tunnel and run OSPF/IS-IS over it, which makes it the most broadly compatible live-ingestion option.
How it works
- The Watcher runs an FRR instance inside an isolated network namespace.
- That FRR forms an OSPF (or IS-IS) adjacency with your router over a GRE tunnel.
- Once adjacent, the router floods its LSDB to the Watcher just like any other neighbor — and the Watcher turns each change into an event for Topolograph, ELK, Zabbix, or Slack.
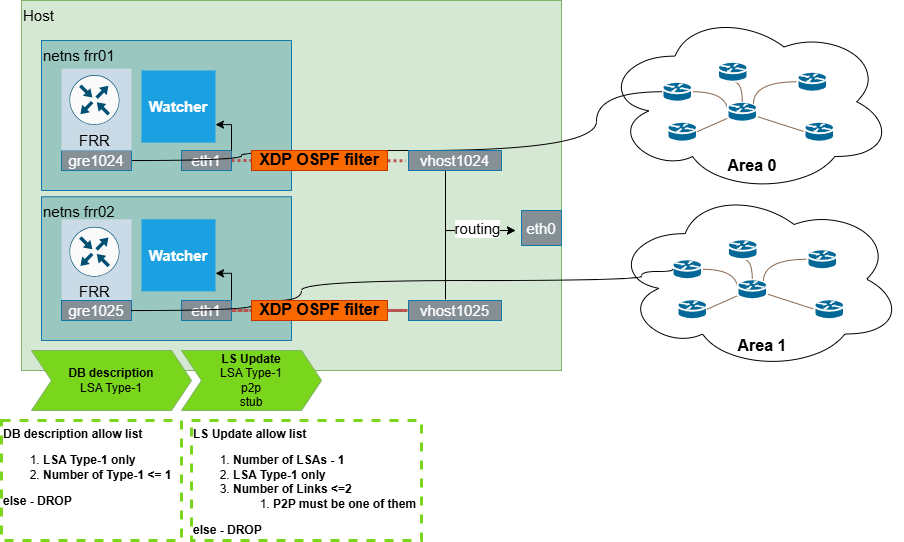
The Watcher is passive — and protected
The Watcher is a listen-only participant. An XDP OSPF filter inspects everything the FRR instance tries to advertise and drops any DB description or LSUpdate that announces more than the Watcher's own GRE tunnel network. This guarantees the Watcher can never inject unexpected prefixes into your OSPF domain. See Listen-only mode.
Each Watcher keeps all routes and updates inside its own namespace, so it never affects host routing or other Watchers.
1. Configure the tunnel on the router
Build a GRE tunnel from the device to the host running the Watcher. A Cisco example:
interface Tunnel0
 ip address <gre-tunnel-ip>
 tunnel mode gre
 tunnel source <router-ip>
 tunnel destination <host-ip>
 ip ospf network type point-to-point
Then include the GRE tunnel network in the router's OSPF/IS-IS configuration so an adjacency can form across it.
2. Configure the Watcher
On the Watcher side, the GRE tunnel network is set in the FRR config
(quagga/config/ospfd.conf for OSPF). Deploying the Watcher lab namespace, for
example via containerlab, creates:
- an isolated network namespace for the Watcher and its FRR,
- a tap-interface pair connecting the Watcher to the Linux host,
- the GRE tunnel inside the Watcher's namespace,
- NAT for the GRE traffic,
- the FRR + Watcher processes,
- the XDP OSPF filter bound to the Watcher's tap interface.
The exact steps live in the Watcher repositories: OSPF Watcher · IS-IS Watcher.
No router handy? Use test mode
Set TEST_MODE=True to feed a Watcher from a static demo LSDB file and
replay sample changes (adjacency loss, metric change) — perfect for trying
the pipeline end-to-end without any device. There's also a ready-made
containerlab lab.
3. Verify the adjacency
Confirm the Watcher's FRR sees your router as a neighbor:
Your network device should appear in the output. If it doesn't, the Watcher ships a diagnostic script — see the troubleshooting section on the OSPF Watcher / IS-IS Watcher pages.
GRE vs BGP-LS
GRE mode needs a tunnel and an IGP adjacency per attachment point. If your routers can export topology over BGP-LS, that mode avoids tunnels entirely and scales more easily across areas/levels.
Next: see what the Watcher does with the feed → OSPF Watcher · IS-IS Watcher